
Vendor On-boarding in Coupa
The Supplier On-boarding Questionnaire is used to gather all required information for Tessera to onboard your company.


01
Supplier Onboarding Questionnaire
Once connected to Tessera in the Coupa Supplier Portal, Tessera will send you their Supplier On-boarding Form in Coupa to begin the on-boarding process.
Click on Notifications next to your name in the Coupa Supplier Portal and click on the Update your profile for Tessera Therapeutics notification message to open the on-boarding form.


02
Company Name & Primary Address
Fields marked with a red asterisk (*) are required.
Legal Name
Your company's official name that is registered with the local government
DBA (Doing Business As) Name
The company name you do business under. (Example: Coupa Testing Inc. would be your legal name and Coupa Testing would be the name you do business as).
Primary Address
Country/Region, State Region, and your company's main address.


03
Primary Contact & Additional Company Information
Primary Contact
This individual will be the main point of contact at your company for any communication from Tessera. Include First Name, Last Name, Email address, and Phone Number.
Are you a Healthcare Provider?
If yes, a National Provider Identifier (NPI) number will need to be provided
PO Email
The email address provided will receive all the purchase orders issued to your company from Tessera
Website URL
URL to your company's website. If there is no company website, enter N/A.
DUNS Number
Your company's 9-digit Duns & Bradsheet number. If you do not have one, you may leave this field blank.
Goods and Services Provided
The goods and/or services you are providing to Tessera (Example: Consulting services)

04
Remit-To Address &
Legal Entity
Virtual Card (Preferred)
Tessera's preferred method of payment is virtual card.
A virtual card is a temporary credit card number that Tessera uses to pay vendors. To enroll, all you'll need to provide is an email address for the person in your company that will be responsible for receiving payment via virtual card.
Remit-To Addresses
The information provided in the Remit-To address section must be tied to your company's bank account. This information is used to add your company's legal entity to your account which will allow you to invoice.
Click on the Add Remit-To button to begin.

05
Add Remit-To Account
If a remit-to has already been added to the account, and you would like to share that information with Tessera, click on the check box next the remit-to you want to share, and click on the Add Selected button. You can move on to Step 11.
To create a new remit-to, click the Add Payment Method button.

06
Business Location
Legal Name
Your company's official name that is registered with the local government
Country/Region
The country region your company is located in


07
About Your Organization
Which customers do you want to see this?
Select which customers should have visibility to the remit-to/payment method you are creating
What address do you invoice from?
The address you invoice from and the address your legal entity is registered to
The Use this address for Remit-To and Use this for Ship From address boxes are auto-checked. If you need to add a different address, you will need to uncheck the boxes.
What is your Tax ID?
Enter your company's Country/Region and Tax ID. If you don't have one, check the I don't have Tax ID Number box
Miscellaneous (Not Required)
Use Invoice From Code field to tie your CSP invoice from address (i.e. registered address) with the corresponding address in your ERP.
Review your information and click Save & Continue.


08
Payment Type & Remit-To Address
Payment Type
Tessera supports Virtual Card and Bank Account payments only.
Payment Type is Bank Account
Enter your company's bank account details: Bank Account Country/Region, State, Bank Account Currency, Beneficiary Name, Bank Name, Account Number, Confirm Account Number, ACH Routing Number, Wire Routing Number, and SWIFT/BIC Code are all required fields. If your bank does not have a SWIFT/BIC code, select the checkbox My bank does not have a BIC code.
Branch Code (Not Required)
Bank Account Type
Select if this is a Business or Personal bank account
Supporting Documents
Upload a bank letter or voided check for the bank account provided
Email Address
Add the email address that should receive remittance details
Who is your Remit-To Contact? (Not Required)
What is your Remit-To Address?
Remit-to address will auto populate if you selected to use the same invoice from address in the previous step
Click Save & Continue.
Payment Type is Virtual Card
Provide the Email Address for the person in your company that is authorized within your company to receive payment via virtual card
Process credit cards automatically?
Check this box only if you have a Stripe account and would like to connect that account to process credit card payments automatically
What is your Remit-To Address?
Remit-to address will auto populate if you selected to use the same invoice from address in the previous step
Click Save & Continue

09
Verify Remit-To Account & Address
Review the Remit-To Account and Address entered. If it is correct, click Next.

10
Ship From Address
Ship From Address
Review the Ship From address. If the address is correct, click Done.
Setup Complete
Select Add Now to add the new remit-to account to the form.


11
Remit-To Address & Remittance Email
The Remit-To Address provided in the previous steps will auto populate in the Remit-To Address fields. Confirm the information is correct. If changes need to be made to the remit-to address populated, click on the Add Remit-To button and repeat steps 5-10.
Remittance Email
Add the email address that should receive remittance details
Confirm that the remit-to address provided is set to Active.


12
Virtual Card & Bank Information
Do you accept Virtual Cards?
If Yes, you may bypass the bank account information fields
If No, you will need to provide a reason why virtual cards are not accepted
Are you an international Supplier?
Select Yes or No
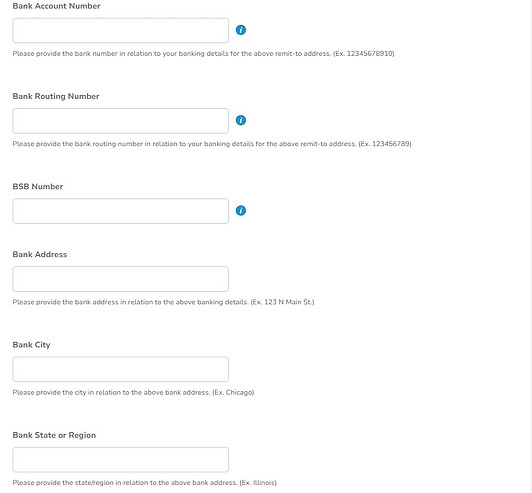
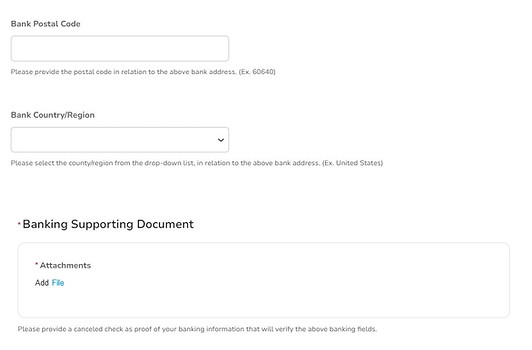
Coupa requires for bank information to be re-entered on the Supplier Onboarding Form. Enter the same bank information you provided when creating the remit-to address in Step 8
Bank Supporting Document
Tessera requires a bank letter or voided check as support documentation. Click File to upload a document from your computer

13
Tax Information
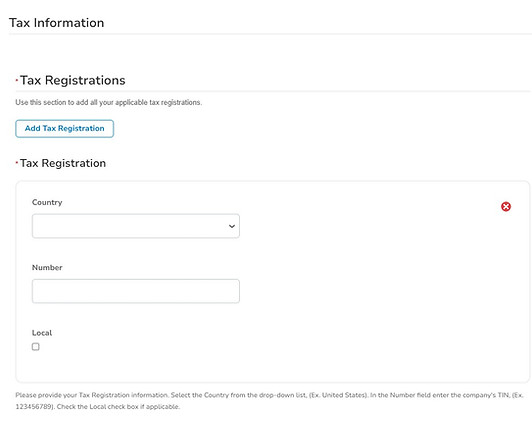
Tax Registration
Click on the Add Tax Registration button. Select the Country from the drop-down list and enter your company's Tax ID number. Check the Local checkbox if applicable.
Tax Form
Select the type of tax form you are providing from the Type drop-down list and upload your company's Tax Form by clicking Add File.
Tax Classification
Specify your company's tax classification in the drop-down list (Example: 1099)
1099 Eligible
Select if your company is 1099 eligible. If yes, you will need to enter the 1099 Tax Code.


14
Certificate of Insurance & Supplier Diversity
Certificate of Insurance
Enter your company's Effective and Expiration Date on the insurance certificate. Upload the insurance certificate by clicking Add File. If applicable, add a description.
If you do not have a certificate of insurance, you may upload a BLANK document and set the Expiration Date to three months from the day you upload the document.
Supplier Diversity (Optional)
This field is optional
Click the Save button if you need to come back to the form.
When ready, review all information entered and click the Submit for Approval button.
Coupa will send the form to Tessera for approval. The form will go to internal departments for review and approval. You will be notified if additional information is required, if your on-boarding was approved or rejected and reason for rejection.